Most remodeling projects start with a single problem: an outdated kitchen, a cluttered garage, a laundry room that doesn’t work. But occasionally a homeowner steps back and asks a bigger question — what if we fix all of it, together, in a single coordinated project? That’s the story of Project P380, and it’s a useful one for any Bay Area homeowner thinking about more than just one room.
Over the years, Adval Construction has completed hundreds of remodels across the Bay Area — from quick cabinet refacing jobs to full custom kitchens. Project P380 sits at the more ambitious end of that spectrum: a homeowner who wanted their whole house to feel cohesive, not just a single room that looked nicer than the rest.
In this case study we’ll walk through exactly what the project covered, the materials and techniques chosen, the reasoning behind each decision, and what we’d recommend to homeowners considering a similar scope of work. If you’re researching a full home remodel in the Bay Area, this should give you a realistic picture of what’s involved.
What’s In This Case Study
- Project at a Glance: Scope & Goals
- The Kitchen: Centerpiece of the Remodel
- Why We Chose a Glazed Porcelain Brick-Pattern Backsplash
- Custom Shaker Panels & the Garbage Pull-Out System
- Garage Upgrade: Why Epoxy Flooring Was the Right Call
- Laundry Room: Small Space, Big Impact
- Interior Enhancements & the TV Room Feature Wall
- How a Multi-Area Remodel Actually Gets Done
- What Drives Cost on a Project Like This
- Lessons from Hundreds of Completed Projects
- Frequently Asked Questions
Project at a Glance: Scope & Goals
Before any tile gets cut or any cabinet gets installed, every project at Adval starts the same way: understanding what the homeowner actually wants their daily life to feel like after the work is done. For Project P380, the homeowner’s notes pointed to four clear priorities:
- Improve kitchen functionality — the existing layout worked, but storage and workflow needed help
- Increase storage throughout the home — not just in the kitchen
- Update outdated finishes so the whole house felt current
- Create a more modern, organized environment — a feeling, not just a look
That last point matters more than people realize. A remodel that only changes how a space looks but ignores how it functions is a remodel the homeowner stops being excited about within a year. So the scope grew naturally from those goals:
- Full kitchen remodel with new backsplash, cabinetry upgrades, island work, and a custom garbage pull-out
- Garage transformation including epoxy flooring, wall and ceiling repairs, and fresh paint
- Laundry room reorganization with new upper cabinets
- Interior enhancements: new door handles throughout, fresh wall paint, consistent finishes
- Custom carpentry: TV room feature wall with paneling and cabinetry, built-in shelving, quartz countertops in select areas
Five distinct work areas. One unified design language. That’s the puzzle a project like P380 has to solve.
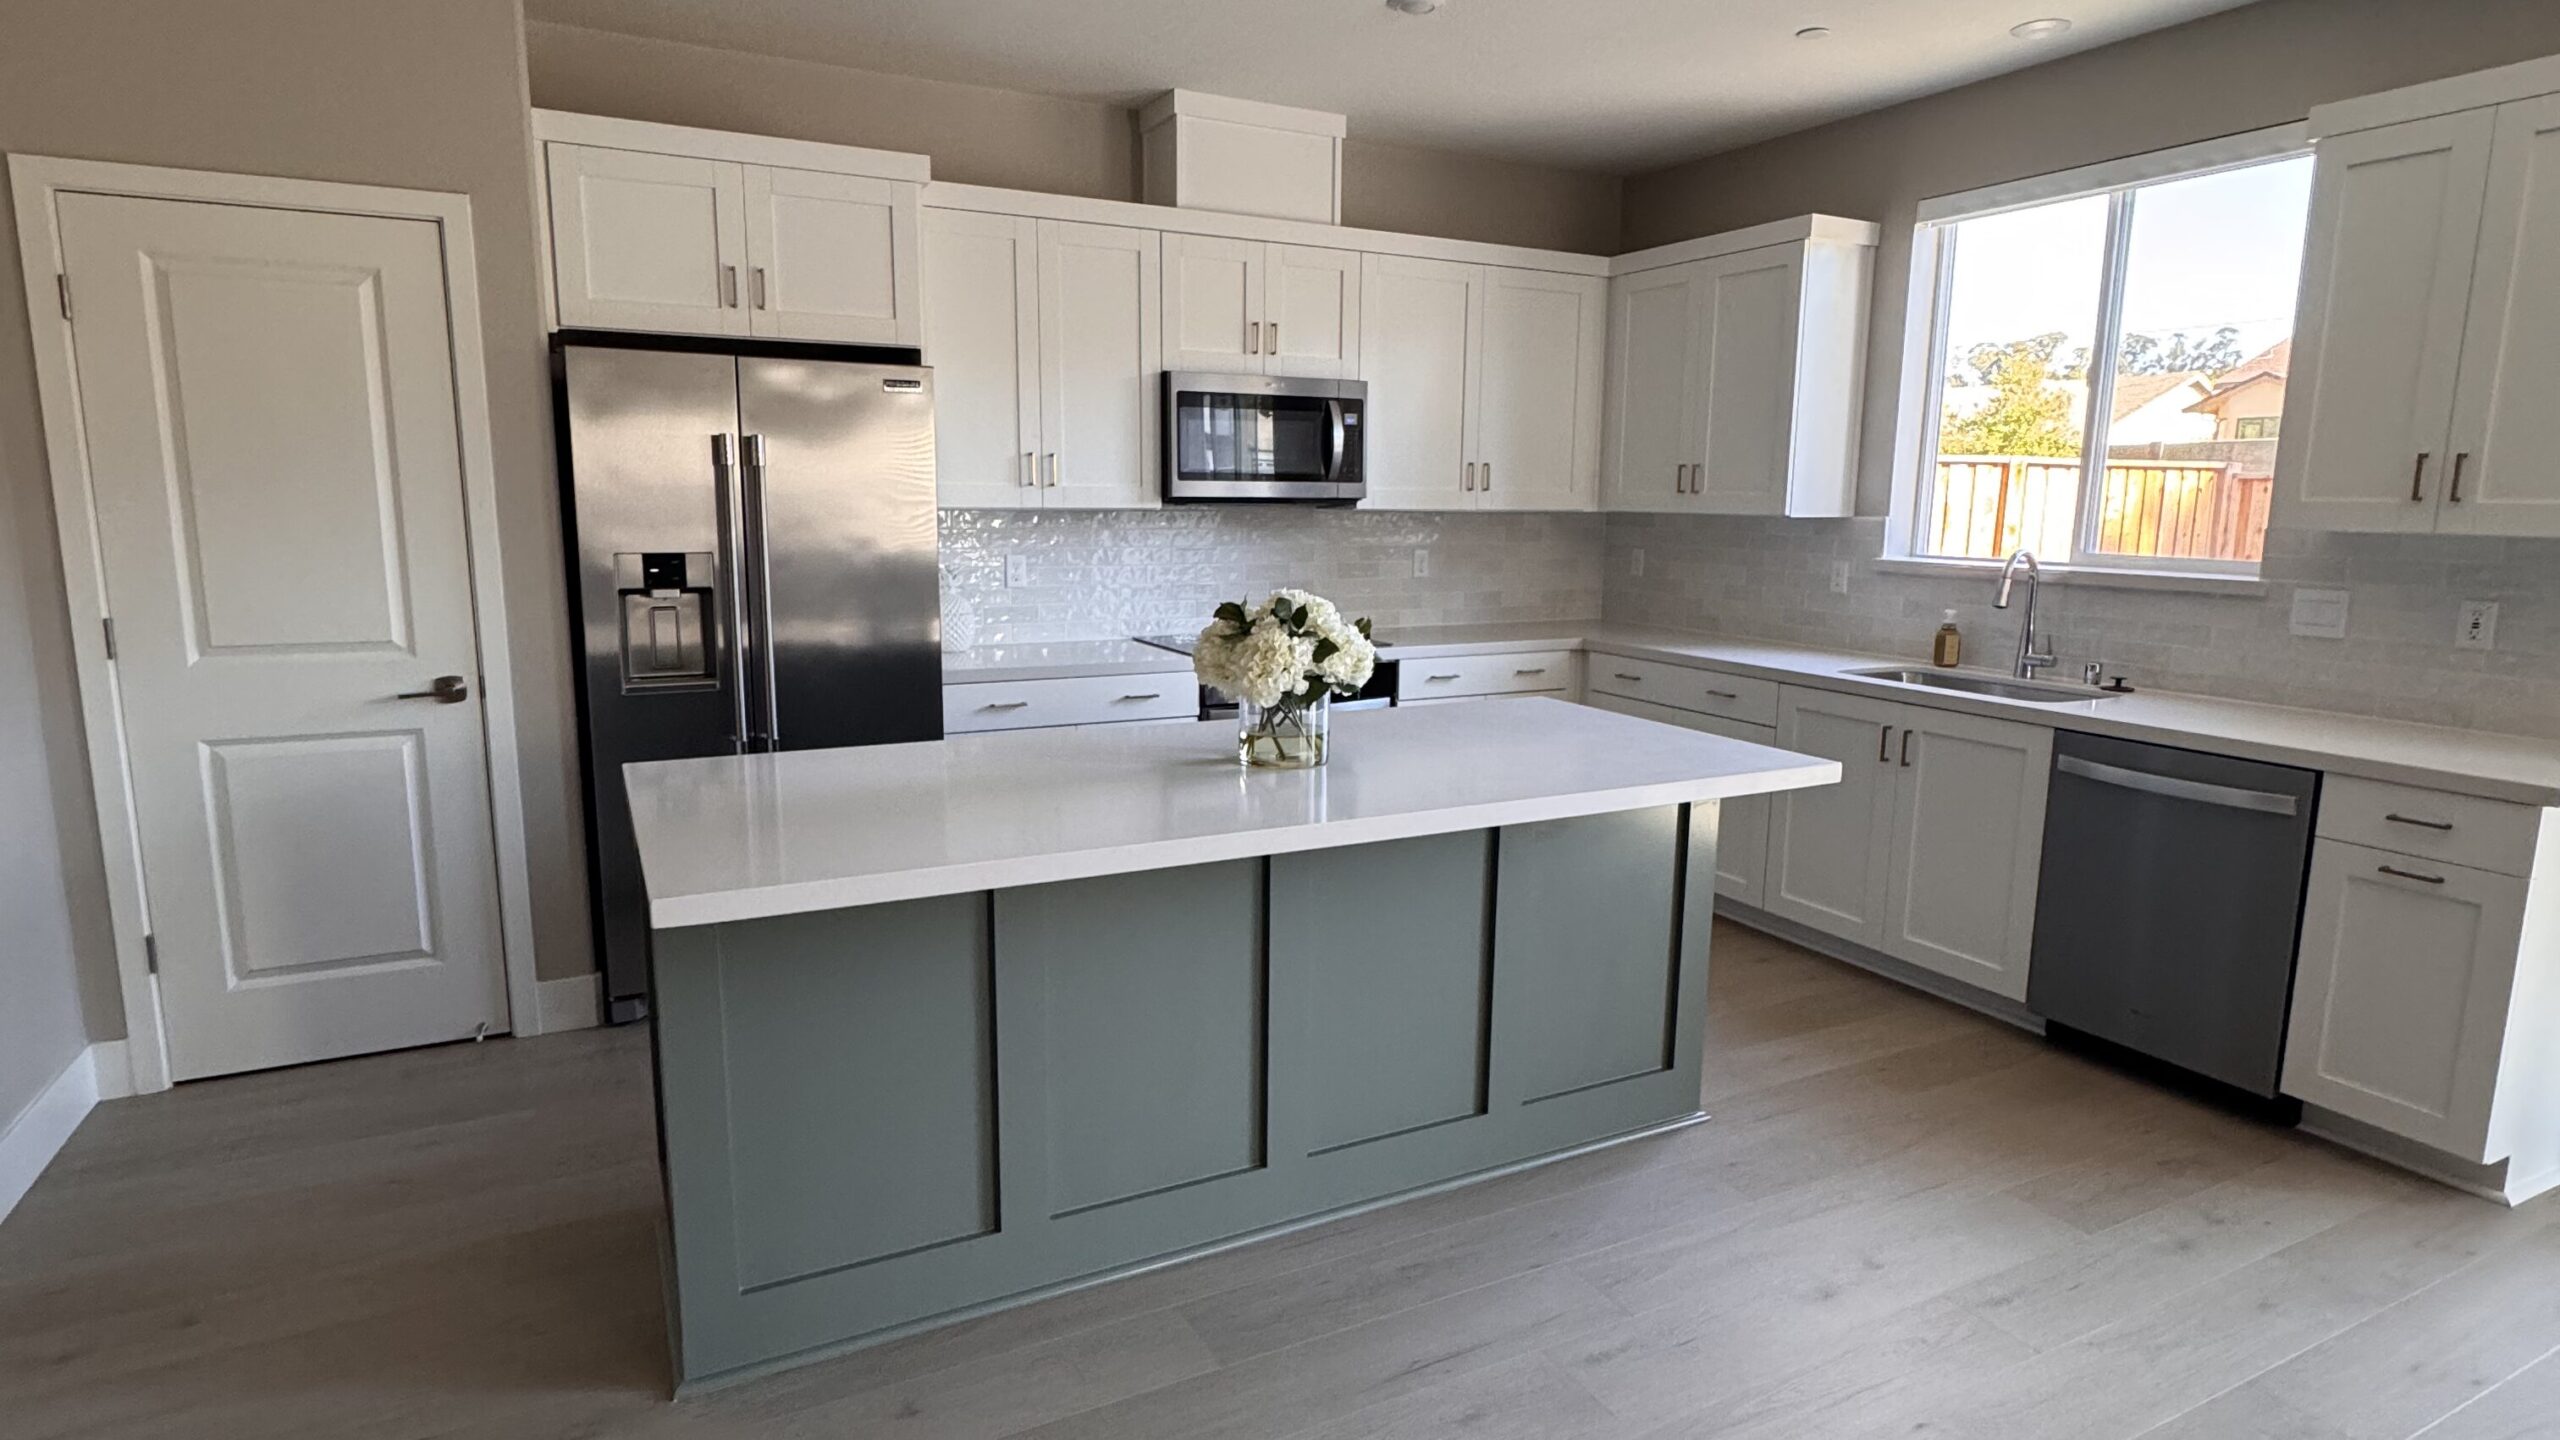
The Kitchen: Centerpiece of the Remodel
Kitchens are where most home remodeling projects either succeed or fall flat. They’re the most-used room in the house, the most expensive square foot to redo, and the room guests judge first. P380’s kitchen had good bones — a workable layout and an island already in place — so the strategy wasn’t to tear everything out. It was to elevate what was there.
The kitchen scope of work included:
- Removal of the existing backsplash
- Installation of new glazed porcelain tile (brick pattern) backsplash
- Custom upgrades to cabinetry including new hardware
- Custom shaker panel installation on the kitchen island
- Construction of an integrated garbage pull-out system
- Full cabinet painting and finishing for a clean, modern look
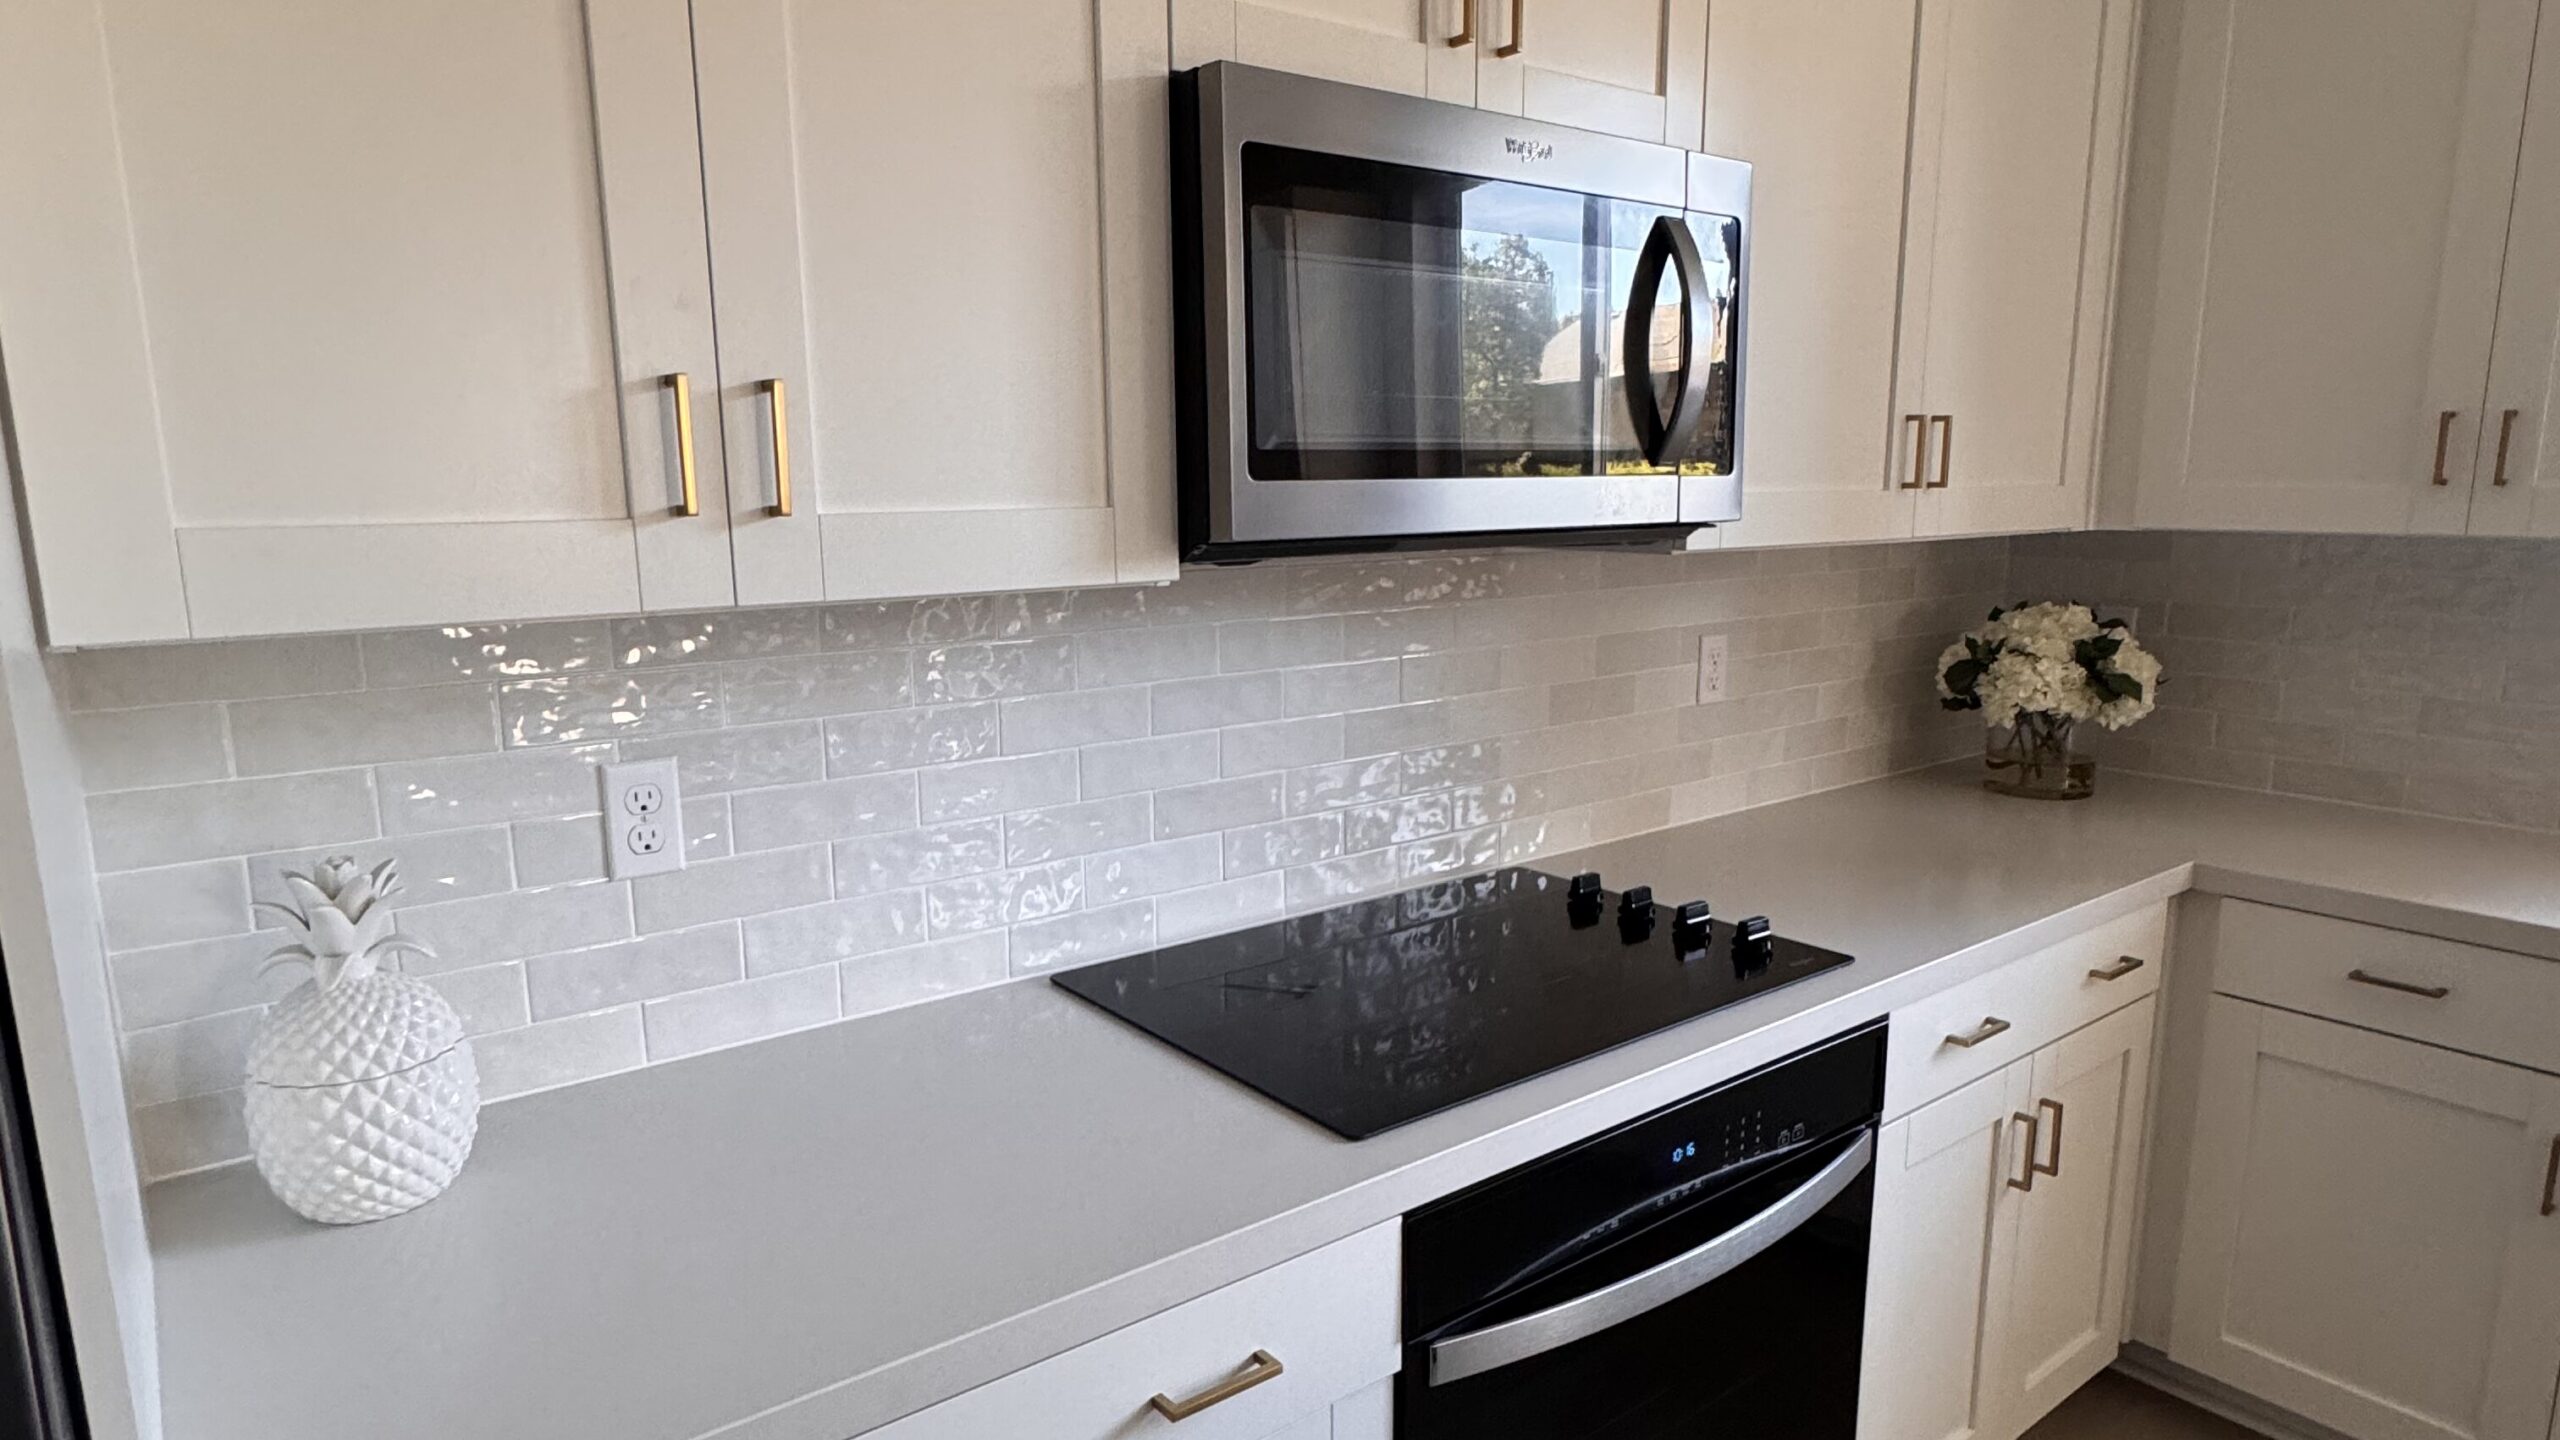
Why We Chose a Glazed Porcelain Brick-Pattern Backsplash
Tile choice is one of the most consequential decisions in any kitchen remodel — partly because it’s so visible, partly because it’s so hard to change later. For P380 we went with a glazed porcelain tile in a brick pattern, and there are real reasons behind both calls:
Why glazed porcelain instead of ceramic or natural stone? Porcelain is denser than standard ceramic, which means it absorbs less water and resists stains better — important behind a cooktop where grease and tomato sauce live their best lives. The glazed finish makes it wipeable with a damp cloth, no sealing required. Natural stone like marble looks beautiful but stains, etches with acid (lemon juice, vinegar), and needs sealing every year or two. Most homeowners regret high-maintenance backsplashes within five years.
Why a brick pattern? A traditional subway or brick layout does something subtle but powerful: it adds visual texture without competing with the cabinetry. In a kitchen with strong white cabinets, a busy mosaic or large-format tile would fight for attention. The brick pattern reads as background — pattern, but quiet pattern — which is exactly what a hardworking kitchen surface should be.
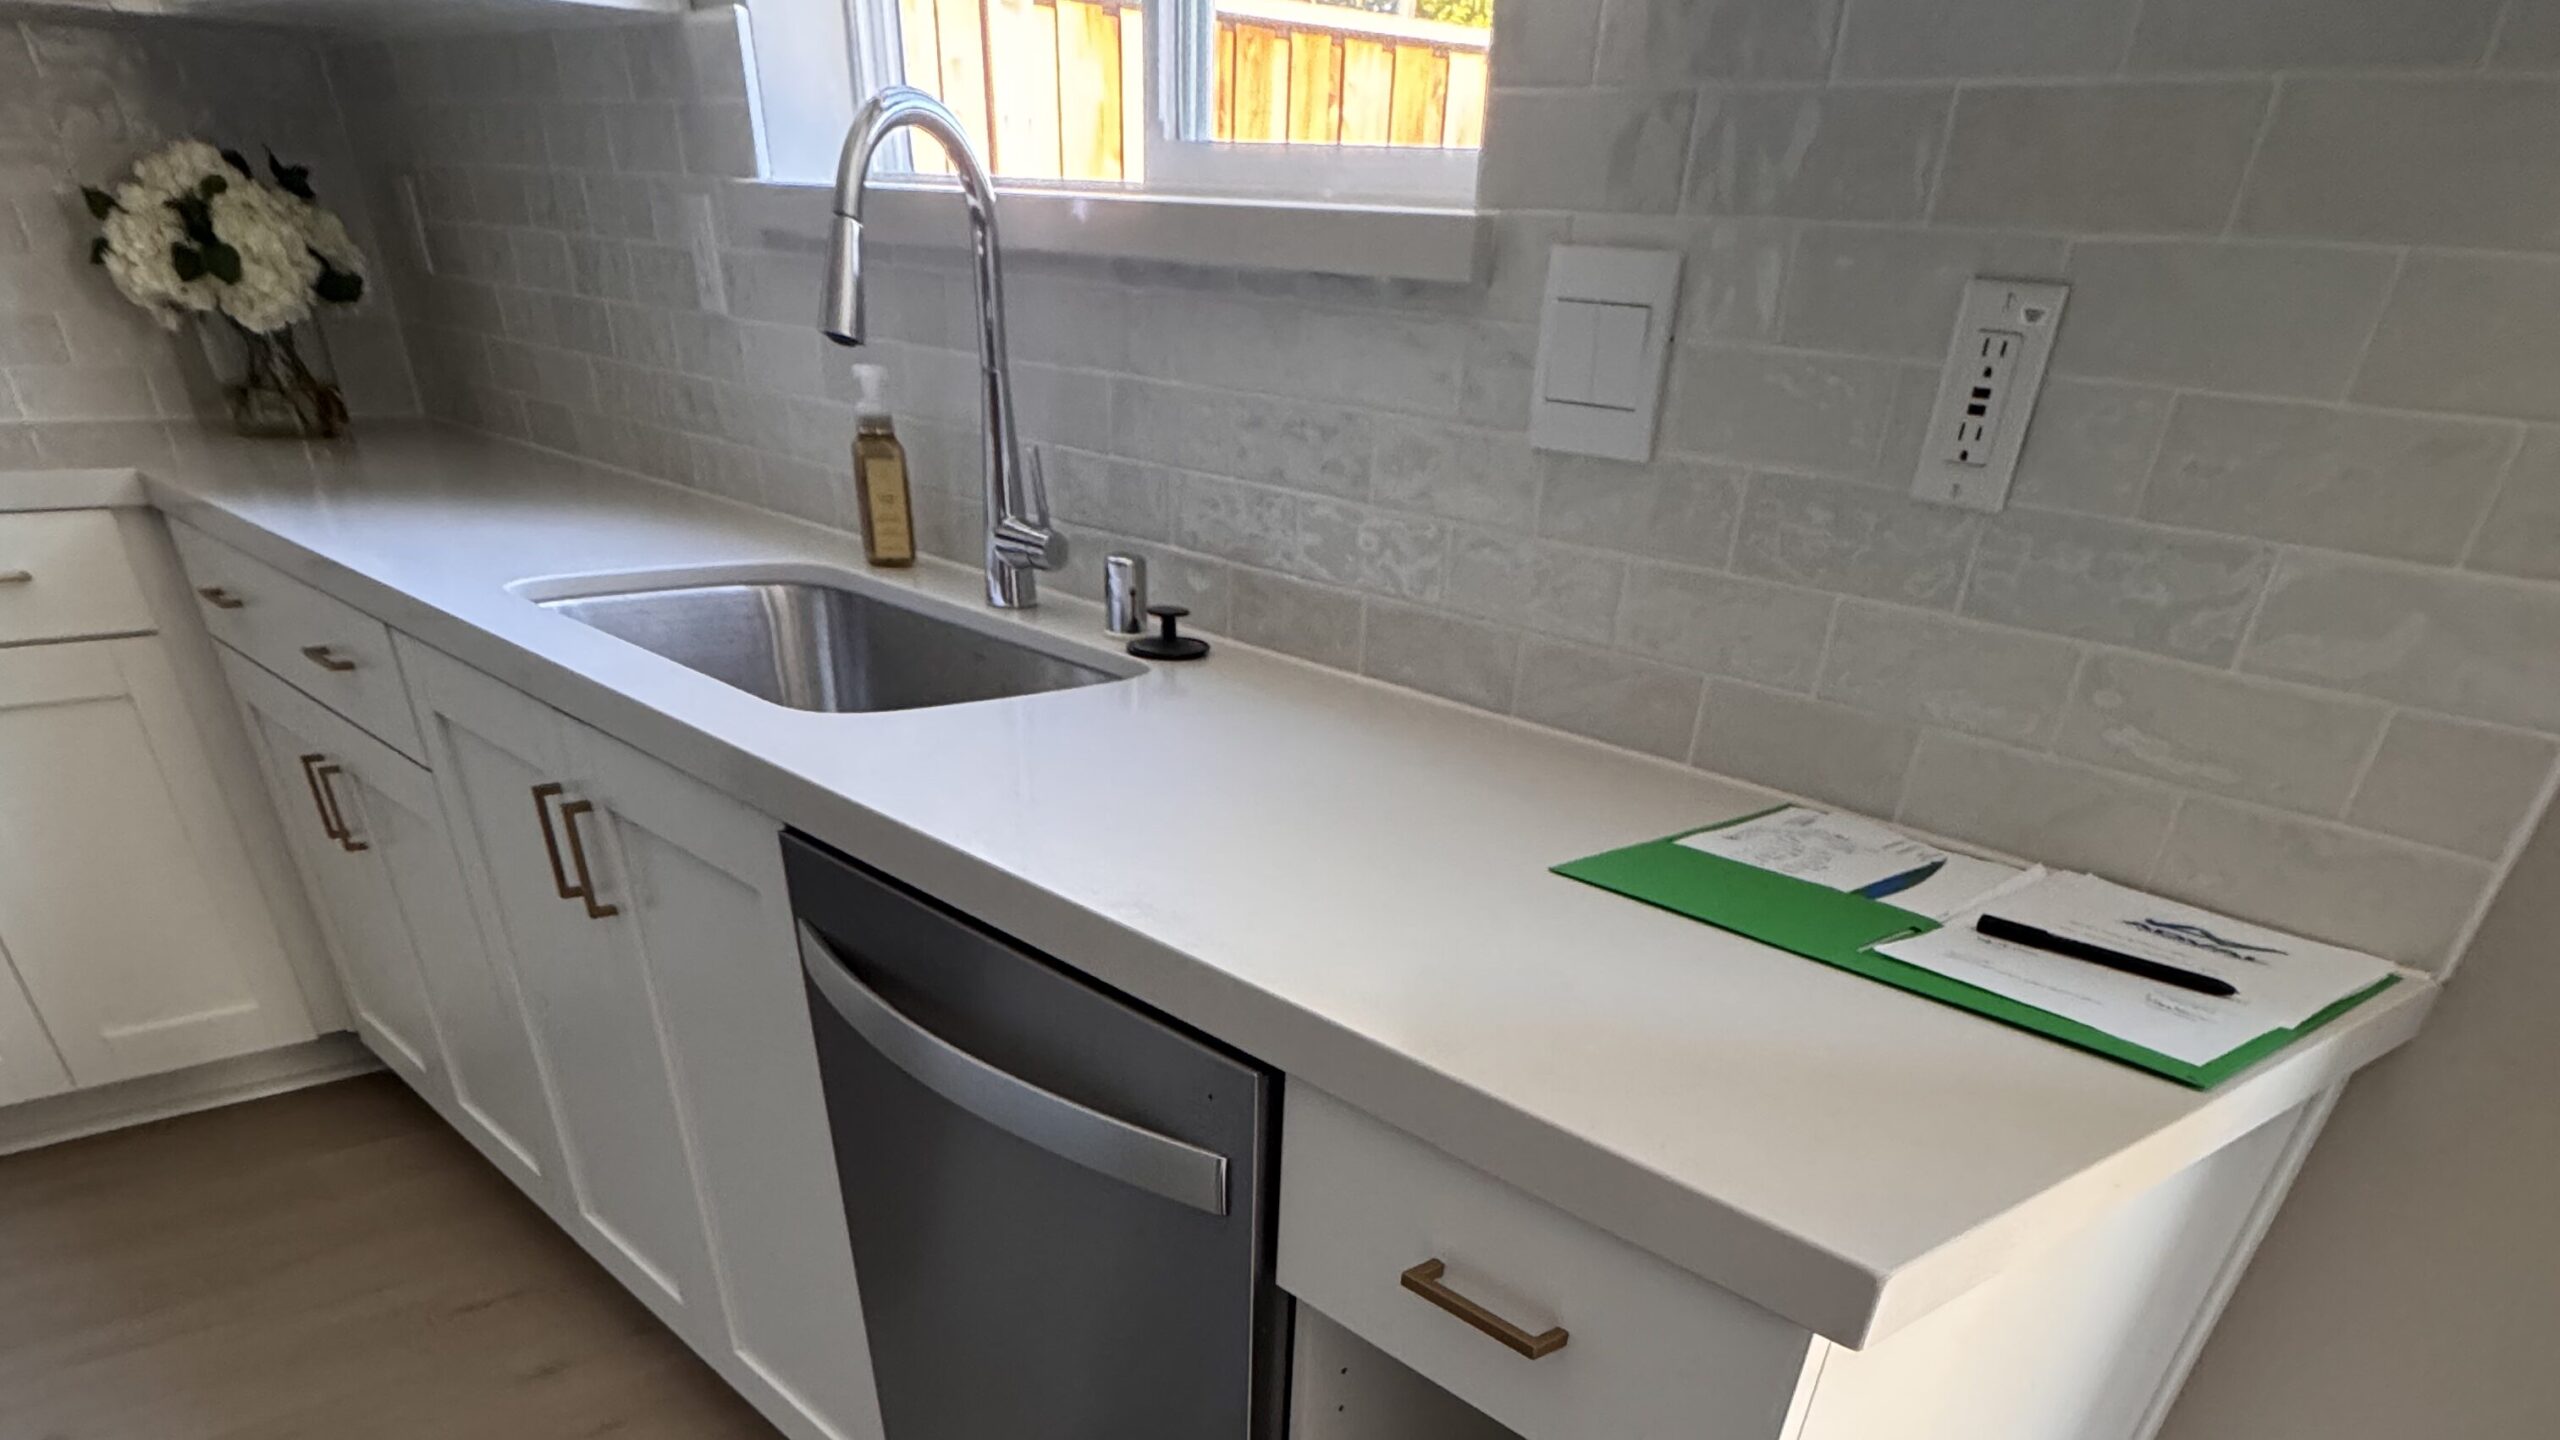
The other detail worth pointing out: the grout color. We selected a grout slightly lighter than the tile to soften the joint lines. A stark contrast grout would have made the pattern shout. The lighter grout lets the tile itself do the talking.
Custom Shaker Panels & the Garbage Pull-Out System
Two of the most important decisions in P380’s kitchen were invisible if you don’t know what you’re looking at — and that’s part of the point. Good remodeling work disappears into daily life.
The custom shaker panels on the island. Kitchen islands often start their lives as a plain box of cabinets — functional, but unfinished-looking on the side that faces the room. Adding custom shaker panels to the visible side of the island transforms it from “block of storage” to “designed piece of furniture.” Shaker is a deliberate choice: it’s been the dominant cabinet style in American kitchens for over a decade because it photographs well, ages well, and works with both traditional and modern interiors. A homeowner who picks shaker today is unlikely to feel embarrassed by it in ten years.
The garbage pull-out system. This is the upgrade homeowners notice every single day after the project ends. Standing trash cans take up floor space, smell, and break the visual line of a clean kitchen. A pull-out system — built into a dedicated cabinet, usually next to the sink or prep area — hides waste behind a cabinet door, contains odors, and makes the kitchen feel bigger. It’s one of those changes that costs a fraction of the overall budget but contributes disproportionately to how livable the space feels.
Hardware was the final layer. New handles were installed across the kitchen, replacing whatever the previous installation had — and we extended that hardware consistency to door handles throughout the rest of the home, which is a small touch that ties the whole house together visually.
Garage Upgrade: Why Epoxy Flooring Was the Right Call
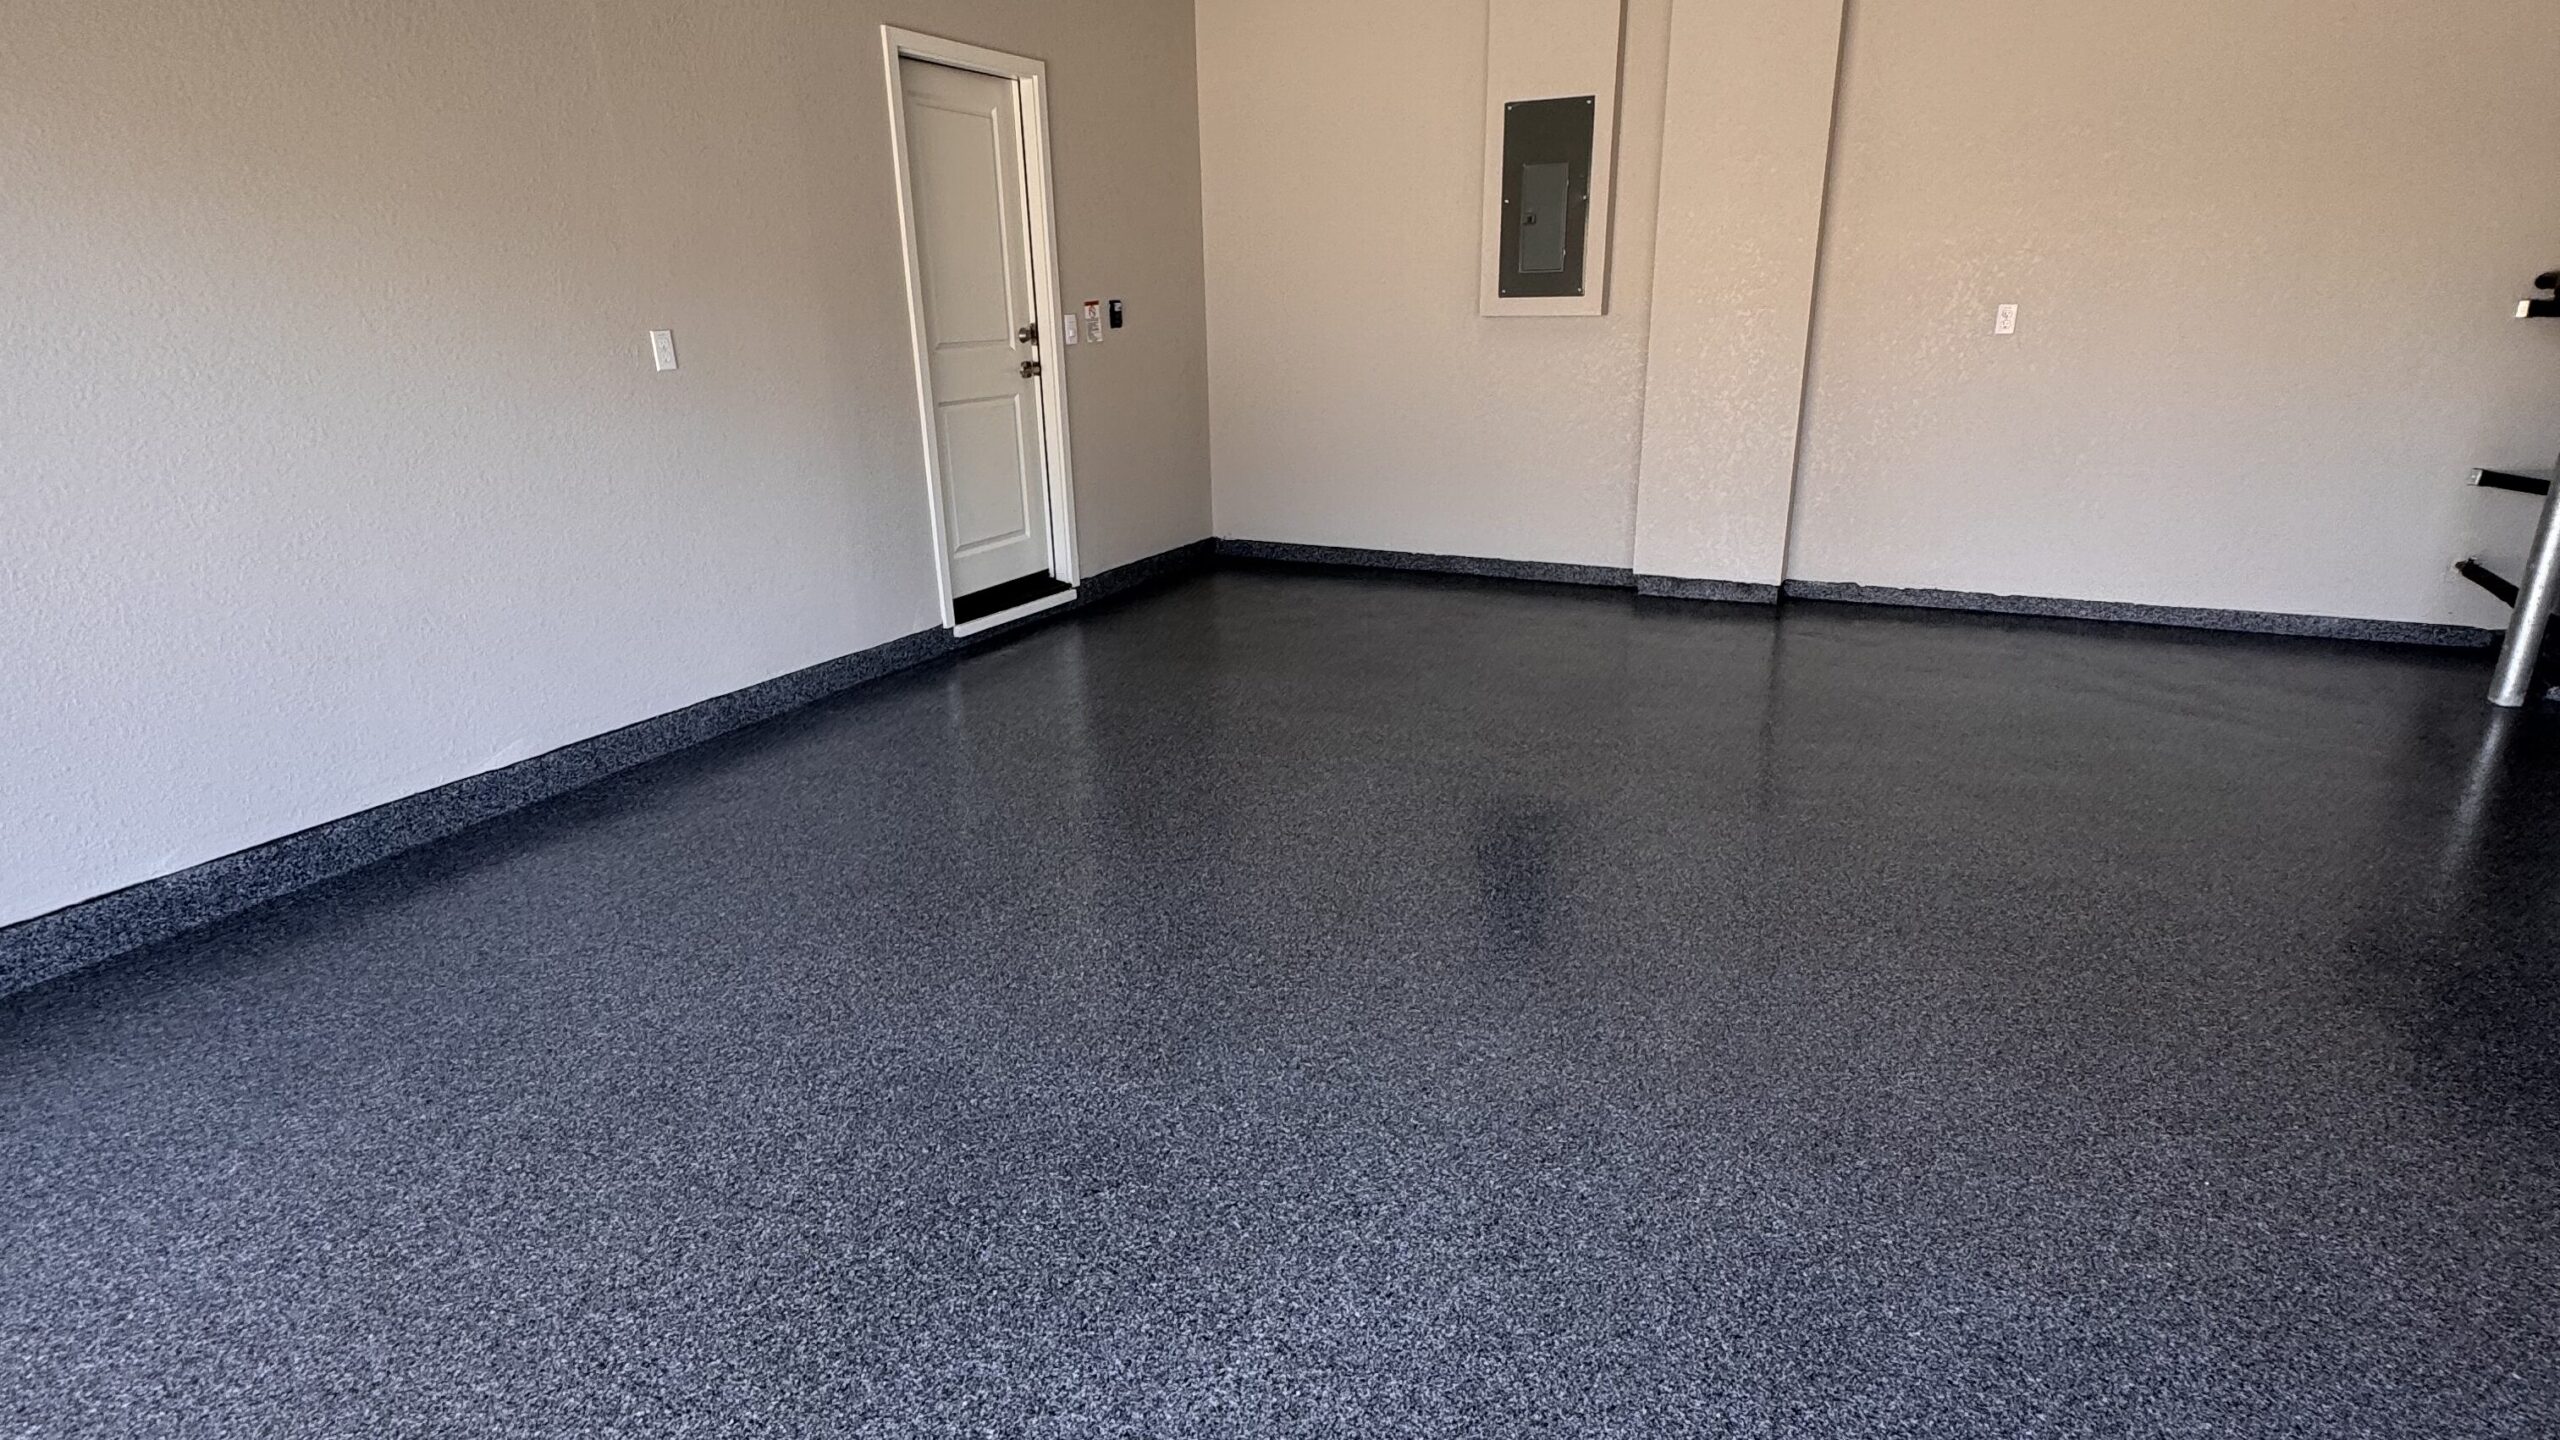
Garages are the most underrated square footage in any American home. Most homeowners treat them as a place to store the things they can’t decide what to do with — and the floor and walls reflect that, usually covered in oil stains, paint splatter, and concrete dust. P380’s garage got a full reset.
The scope:
- Wall and ceiling texture improvements
- Interior wall repairs
- Fresh paint on walls and ceiling
- Epoxy flooring installation
Why epoxy for a garage floor? Concrete by itself is porous — it absorbs oil, road salt from cars, fluid leaks, anything you spill. Once it’s stained, it’s effectively stained forever; pressure washing barely helps. Epoxy is a two-part resin coating that bonds chemically to the concrete and seals it. The result is a surface that’s:
- Resistant to oil, gasoline, and chemicals — spills wipe up instead of soaking in
- Easy to clean — a broom and occasional mop replace any kind of deep cleaning
- Much brighter — most epoxy finishes reflect more light than bare concrete, so the garage feels less like a cave
- Durable — properly installed epoxy lasts 10–20 years under residential use
The catch: epoxy installation is much more about surface prep than about the coating itself. The concrete has to be ground or etched, cracks have to be filled, and the moisture content of the slab matters. A rushed prep job is the number-one reason epoxy floors fail. This is one of those areas where DIY shortcuts almost always show up two years later as peeling and bubbling.
Laundry Room: Small Space, Big Impact
Laundry rooms get treated like afterthoughts in most homes — usually a pair of machines crammed against a wall with no surface to fold on and no real storage. P380’s laundry room got a modest but meaningful upgrade:
- New upper cabinets installed
- Enhanced storage and organization
- Clean, functional layout improvements
The case for putting time and money into a laundry room is simple math. The average American household runs 6–8 loads of laundry per week, which adds up to a few hundred hours per year in a single room. Almost any other room in the house gets less use than that. Even modest upgrades — upper cabinets that hide detergent and supplies, a small folding surface, organized storage — pay back daily in convenience.
Interior Enhancements & the TV Room Feature Wall
The interior work in P380 was about consistency. When a kitchen gets remodeled but the rest of the house keeps its old finishes, door handles, and wall colors, the new kitchen ends up looking like an alien spaceship that landed in the middle of a 1990s home. Avoiding that disconnect was a big part of the project’s mission.
Specifically, the team:
- Installed new door handles throughout the home, matching the kitchen hardware
- Repainted walls in multiple areas with a consistent palette
- Standardized finishes so transitions between rooms felt intentional
This is where our interior custom remodel approach really shows up — small details, applied consistently, that no individual visitor will consciously notice but that make the house feel finished.
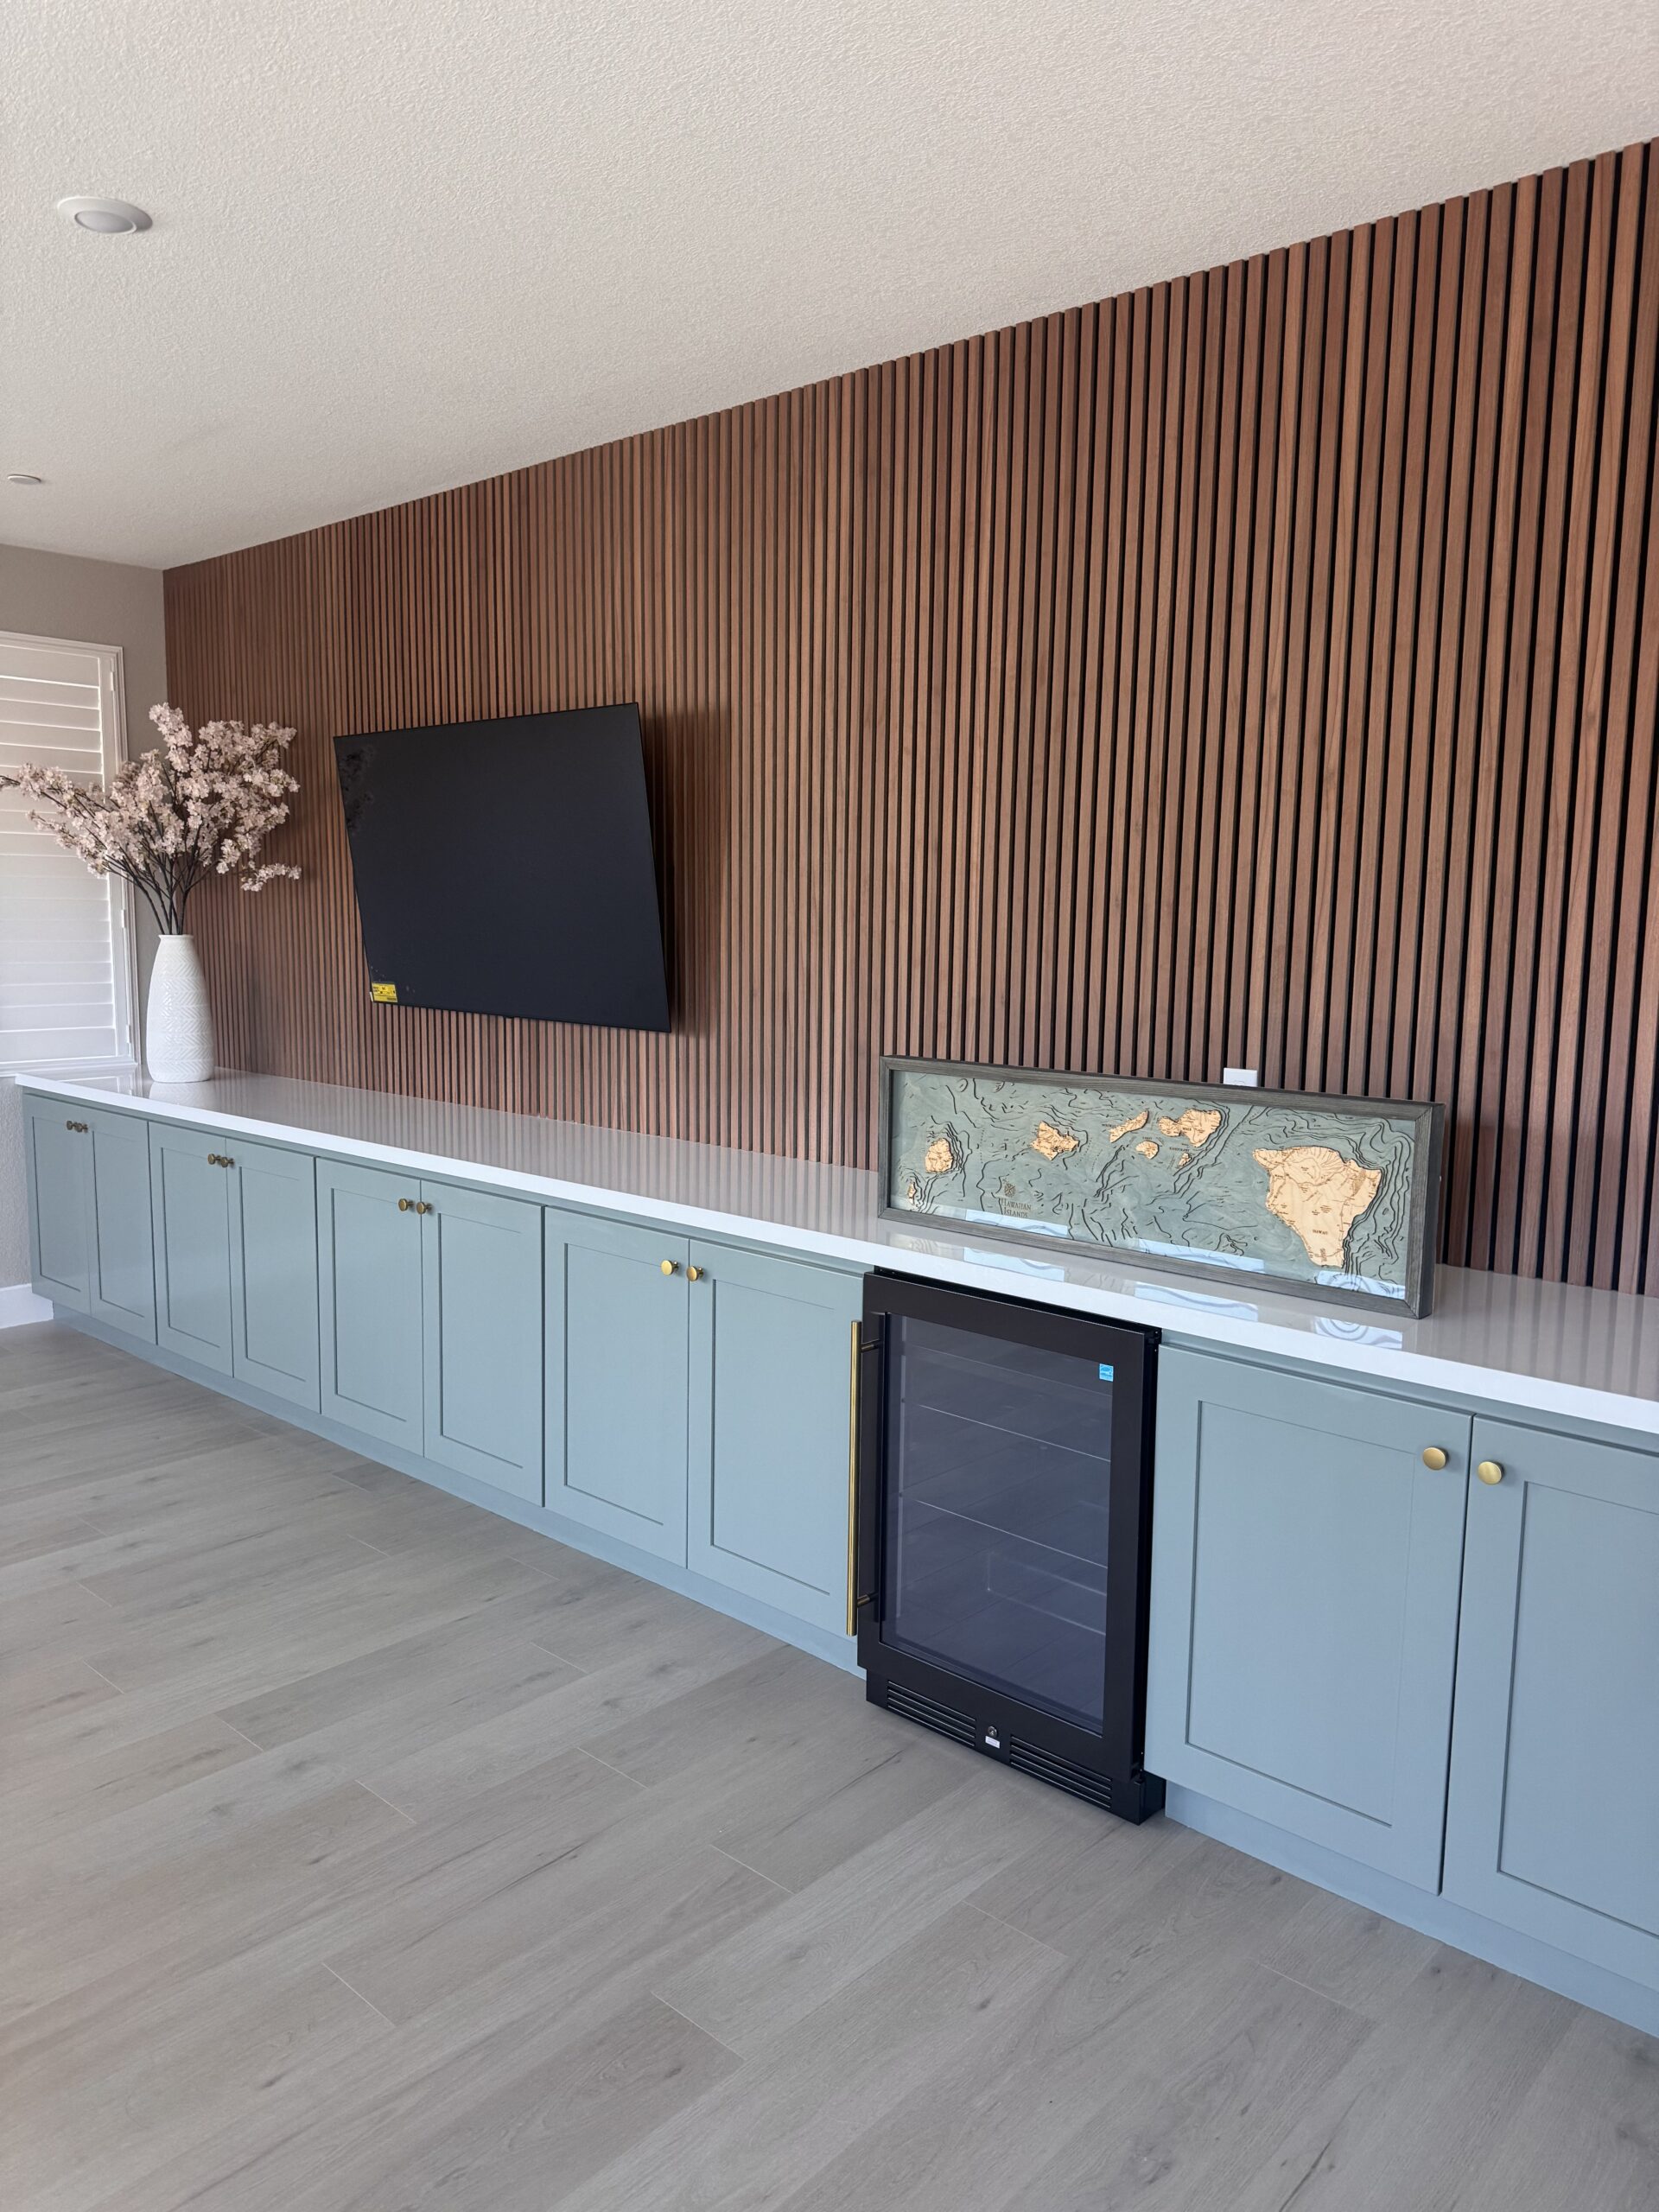
The TV Room Feature Wall
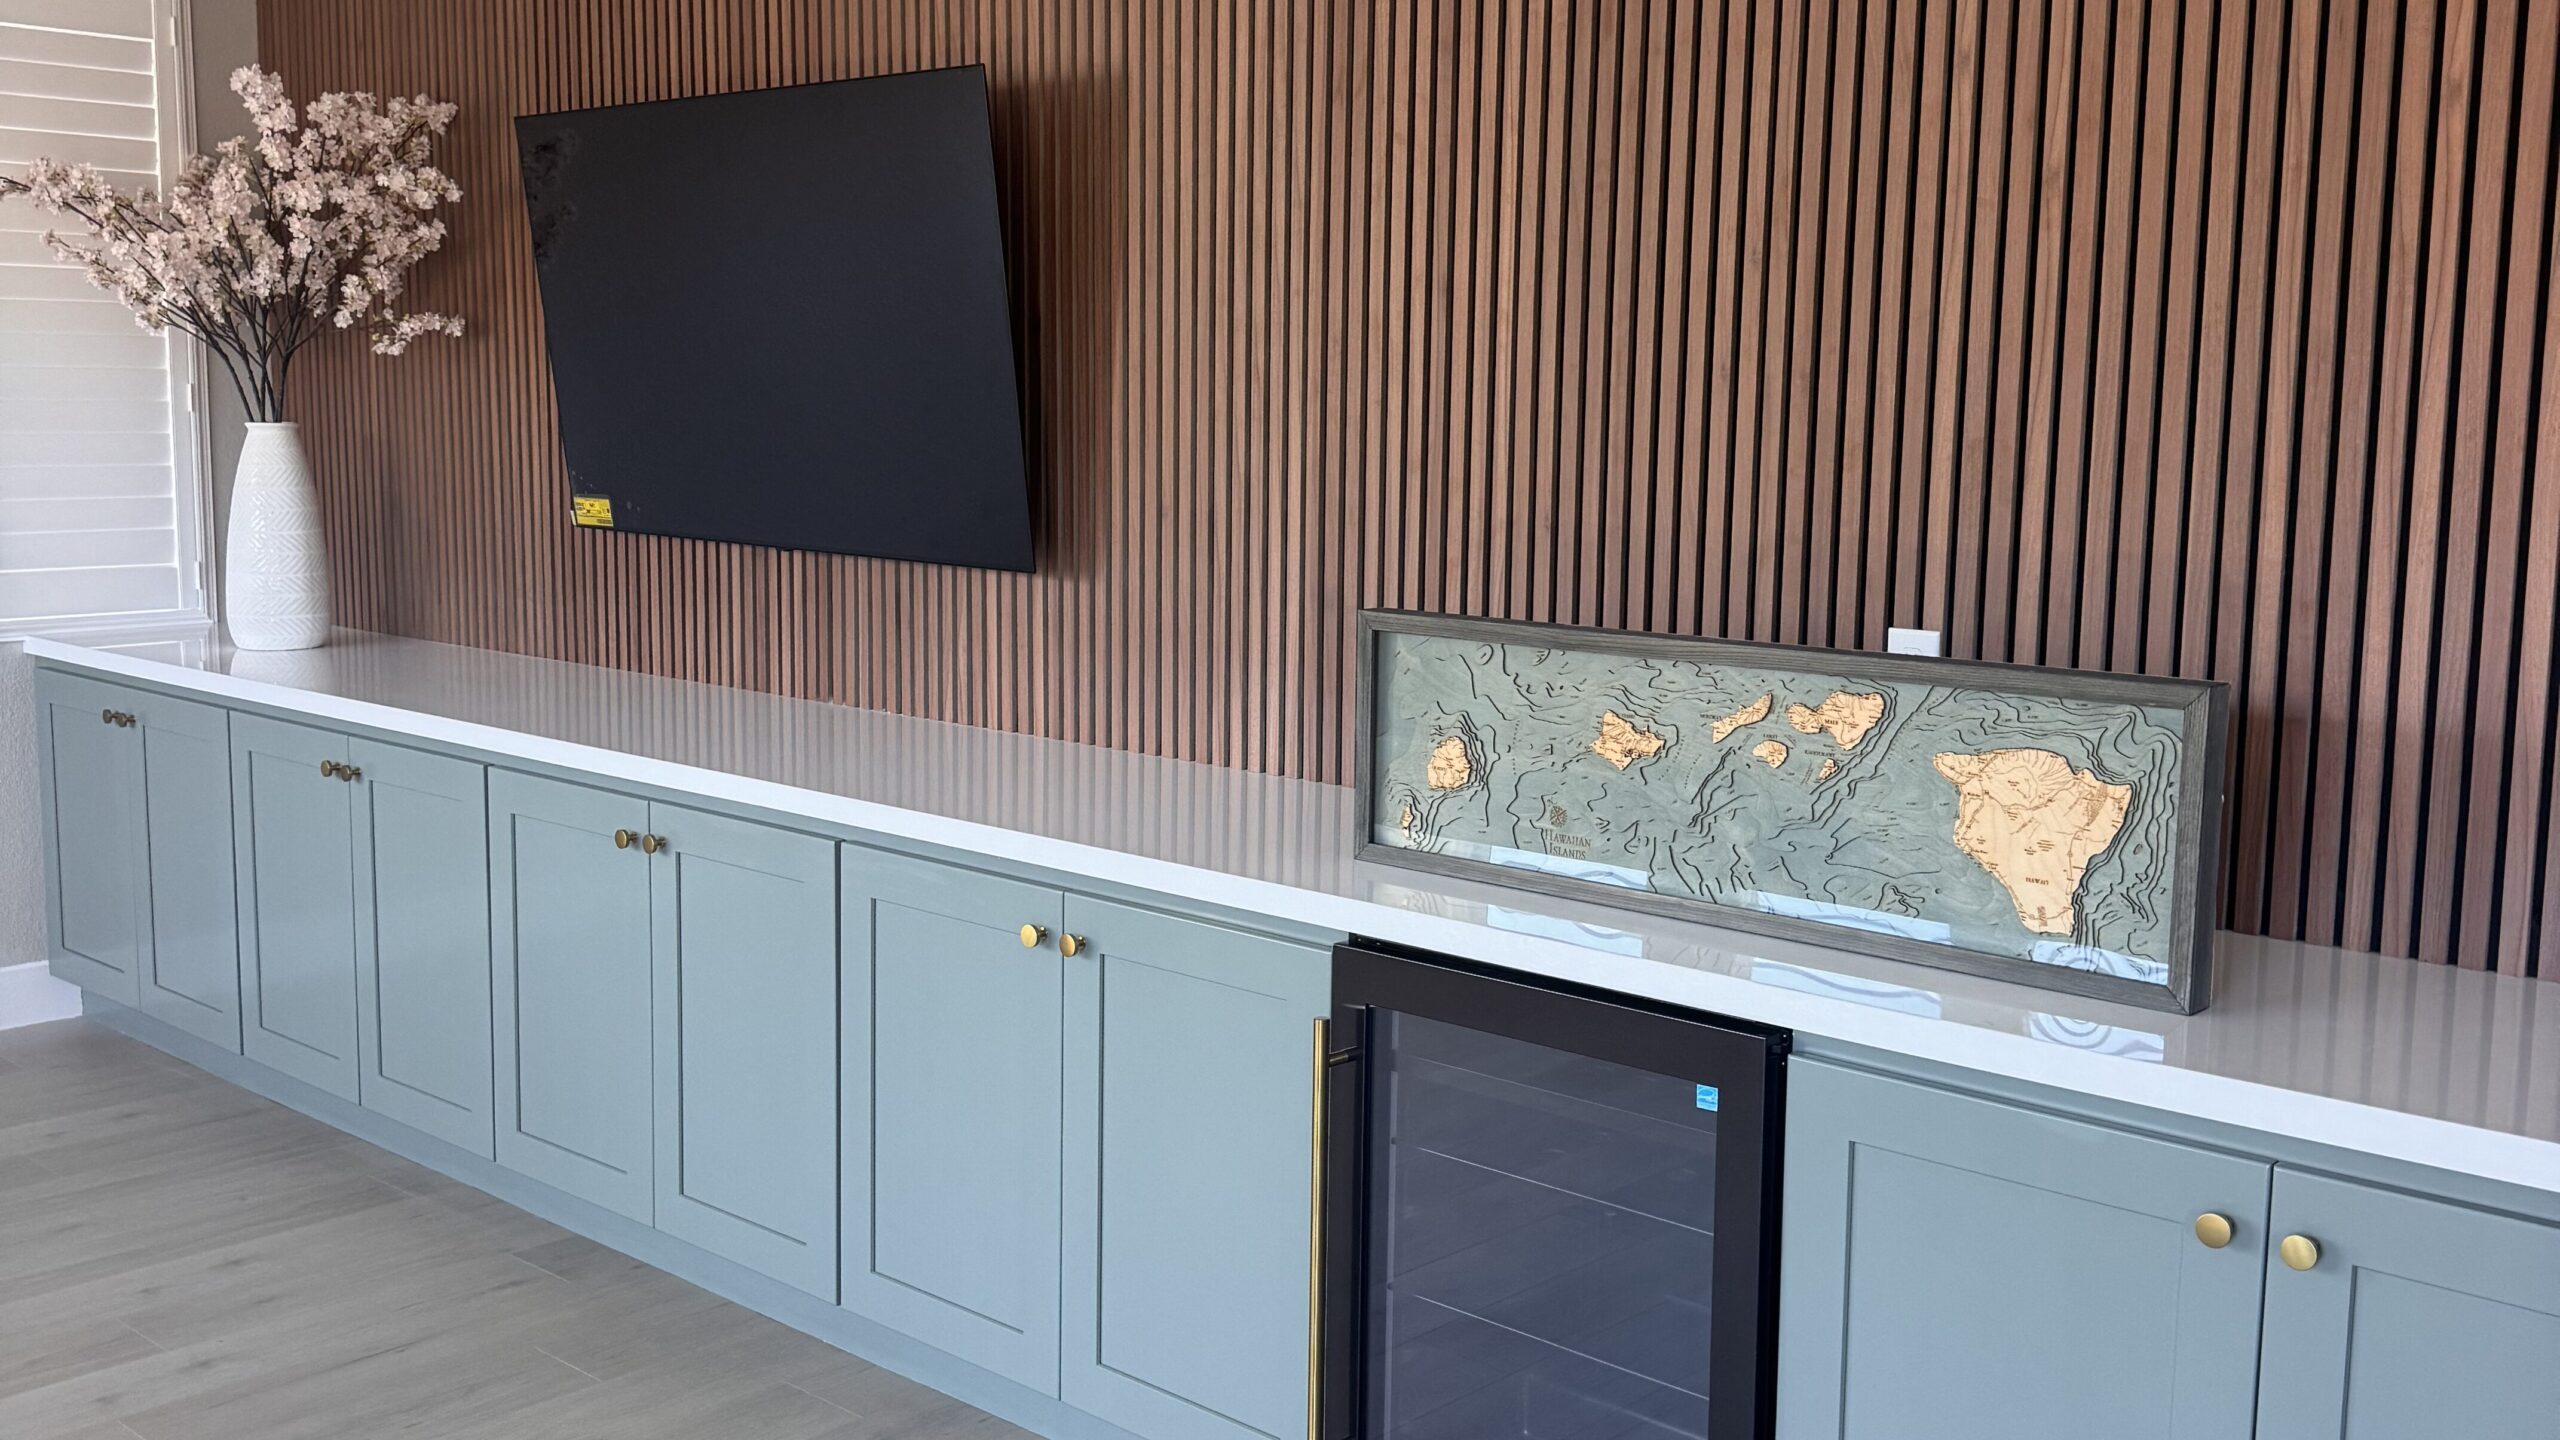
If the kitchen is the home’s centerpiece, the TV room feature wall is its signature moment. Vertical wood slat paneling has had a strong run in residential design over the last few years for good reason — it adds warmth and texture to a room without committing the homeowner to a major furniture rearrangement. It also hides imperfections in the wall behind it, so it’s a useful tool when the underlying surface isn’t perfect.
Under the paneling, custom built-in cabinetry with a quartz top gives the room a media surface that doubles as storage and display. Built-ins like this are a smart investment for a few reasons:
- They’re sized perfectly to the wall, so no wasted space
- They eliminate the need for freestanding furniture that may never quite fit
- They appear as part of the home rather than a piece that could be removed — which generally adds resale value
How a Multi-Area Remodel Actually Gets Done
Here’s something most remodeling content doesn’t tell you: the hardest part of a project like P380 isn’t any single trade — it’s the sequencing. When you have a kitchen, a garage, a laundry room, an interior repaint, and custom carpentry all happening in the same house, the order of operations is everything.
Get it wrong and you’ll be painting walls twice, or installing new flooring before drywall dust has a chance to settle into it, or finishing cabinetry before the electrician has run final wiring. Get it right and the trades flow through the project without backtracking.
Our typical sequence on a multi-area project looks roughly like this:
- Demo and rough-in work first. Remove what’s being replaced. Run any new electrical, plumbing, or framing while walls and floors are open.
- Drywall and texture. Patch, sand, and prime. Don’t paint yet.
- Floor prep where needed. Concrete grinding for epoxy, subfloor leveling for other flooring types.
- Cabinets in. Boxes first, then doors and panels.
- Countertops template and install — usually a 1–2 week gap here for fabrication.
- Tile and backsplash.
- Paint. Walls and trim, in that order.
- Flooring final layers (epoxy top coats, etc.).
- Hardware, fixtures, handles, and finishing details.
- Final walkthrough and punch list.
A dedicated project manager keeps all of this on schedule. On P380, that meant coordinating multiple trades across multiple rooms, ordering materials with the right lead times, and making sure the homeowner always knew what was happening that week.
What Drives Cost on a Project Like This
Every homeowner asks the same first question — “what does this cost?” — and every honest contractor gives the same first answer: it depends. Not because we’re being evasive, but because the same five-area scope can run a wide range depending on choices the homeowner hasn’t made yet. The factors that move the budget most:
- Cabinet decisions. Refacing existing cabinets is dramatically less expensive than ordering custom new boxes. P380 mixed both — keeping existing cabinets where they were sound and adding custom shaker panels where impact was needed.
- Countertop material. Quartz, granite, marble, and butcher block all have different per-square-foot pricing. Quartz was the right call here for durability and consistency.
- Tile selection. Glazed porcelain like the brick-pattern tile we used is mid-range. Designer Italian tile can be 3–5× the price for similar function.
- Epoxy system grade. Residential-grade single-coat epoxy vs. commercial multi-coat systems with flake or quartz aggregates is a meaningful price difference.
- Scope creep. The most controllable cost factor. Decisions made before demo starts cost less than decisions made after demo starts.
This is one reason we offer free in-home consultations with detailed estimates. Trying to estimate a full home remodel over the phone or by email is how surprises happen — the kind nobody wants.
We also offer flexible financing through Synchrony with promotional plans including 0% interest for qualifying customers, which makes a project of this scope much more accessible than a single lump-sum payment.
Lessons from Hundreds of Completed Projects
Project P380 didn’t happen in a vacuum. It’s the 380th completed project — and the reason that number matters is that every project before it taught us something. A few lessons that shaped how P380 was executed:
Communication beats craftsmanship if you have to pick. The best work in the world disappoints a homeowner if they don’t know what’s happening day-to-day. We learned to over-communicate: weekly updates, clear timelines, single-point-of-contact project management. A 4.9-star average across 500+ verified reviews isn’t about how well we install cabinets — it’s about how well we keep clients informed while we install them.
Hire your installers, don’t subcontract them. Most contractors in the Bay Area are middlemen — they sell you the job and hire third-party subs to do the work. We do the opposite: trained, in-house installers who work on every project. The quality control difference shows up most on small details, the kind that subs cut corners on when nobody’s watching.
Cohesion is invisible — and that’s how you know it’s working. When a remodel is done right, nobody walks in and says “wow, these handles match the cabinetry which matches the trim color.” They just feel that the house is calm. P380 is the kind of project where the homeowner notices new things they love for weeks after move-back-in.
Warranties matter because contractors disappear. Many remodeling companies are gone within five years of a project — leaving homeowners with no recourse when something needs adjustment. Adval has been serving the Bay Area for over 20 years with full warranty coverage on labor and materials, which is something to ask about with any contractor, not just us.
Thinking About a Full Home Remodel?
If you’ve been considering more than just a single-room renovation, Project P380 is a useful benchmark for what’s possible. Adval Construction is a family-owned, fully licensed (CSLB 1059130) and insured general contractor serving the entire Bay Area, with specialization in:
- Kitchen Custom Remodel
- Bathroom Custom Remodel
- Interior Custom Remodel
- Cabinet Refacing (often 50% less than full replacement)
- Cabinet Refinishing
- Cabinet Painting
- Flooring Installation (including garage epoxy)
- Countertop Installation
We serve homeowners across Contra Costa County, Solano County, and 9 counties total across the Bay Area.
Start Your Project With a Free Consultation
The first step is a free in-home design consultation — no obligation, less than 30 seconds to request, and you’ll get a clear picture of what your project would actually involve.
👉 Request your free in-home consultation
📞 Or call us directly: (925) 278-8726 — available 24/7
Frequently Asked Questions
What was included in Project P380?
Project P380 was a full home remodel that included a complete kitchen renovation (new backsplash, custom shaker panels on the island, integrated garbage pull-out system, hardware upgrades, painting), garage transformation with epoxy flooring and full repaint, laundry room upgrades with new upper cabinets, custom TV room feature wall with paneling and built-in cabinetry, quartz countertops in select areas, and home-wide interior refresh including new door handles and consistent wall paint.
How long does a full home remodel like Project P380 take?
Multi-area remodels of this scope typically run 8–16 weeks from start to final walkthrough, depending on the number of work areas, material lead times (especially for custom cabinetry and countertops), and any unforeseen conditions found during demo. We provide a project timeline at the estimate stage and update it weekly throughout the work.
What makes Project P380 different from a typical kitchen remodel?
Unlike a single-room remodel, P380 required coordination across five separate work areas — kitchen, garage, laundry, interior, and custom carpentry — with consistent design language and material choices across all of them. The complexity is less about any one space and more about the sequencing, communication, and cohesion required to make them feel like one project rather than five.
Why use epoxy flooring for a garage?
Epoxy creates a chemical-resistant, easy-to-clean, durable surface that bonds to the concrete. It resists oil and chemical stains, brightens the space significantly, and properly installed lasts 10–20 years under residential use. The key is proper concrete prep — grinding or etching, crack repair, moisture testing — which is where most DIY or budget installations fail.
Why glazed porcelain backsplash instead of natural stone?
Glazed porcelain is denser than ceramic, resists stains and water absorption, and requires no sealing. Natural stone like marble looks beautiful but stains and etches with everyday acidic substances (lemon juice, vinegar, wine), and needs annual sealing. For a working kitchen, porcelain is the lower-maintenance, longer-lasting choice.
Does Adval Construction handle full home remodels?
Yes. We handle both single-room renovations like cabinet refacing or a kitchen remodel, and full multi-area home remodels like Project P380. Request a free consultation to discuss your project scope.
What areas does Adval Construction serve?
We serve the entire San Francisco Bay Area across 9 counties, with primary service zones in Contra Costa County and Solano County. See our full service map →
Is financing available for projects of this size?
Yes. We offer flexible financing options through Synchrony, including promotional plans with 0% interest for up to 18 months for qualifying customers (subject to credit approval). Many homeowners use financing to make a larger project manageable without delaying the work.
Is Adval Construction licensed and insured?
Yes. Adval Construction Inc is fully licensed (CSLB 1059130), bonded, and insured. We also provide warranty coverage on both labor and materials — something worth verifying with any contractor before signing a contract.